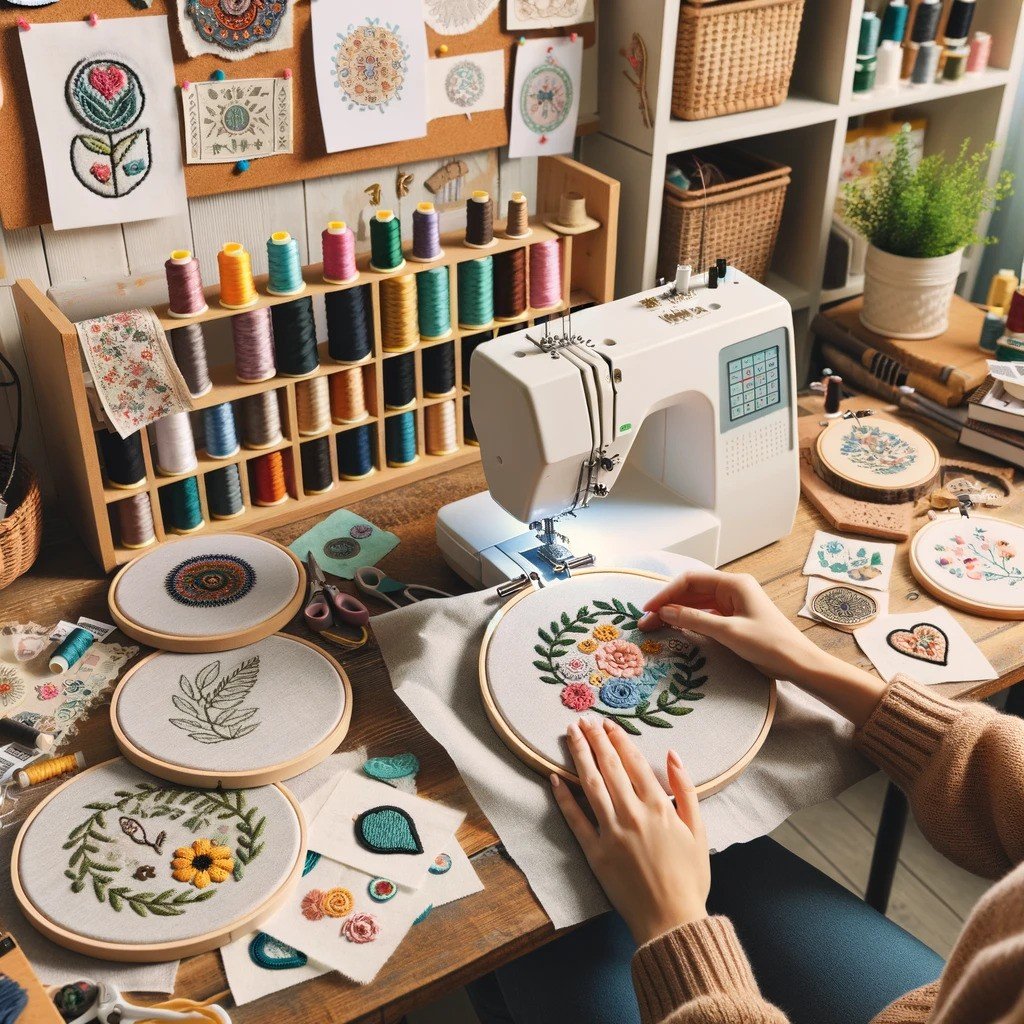
To make custom embroidered patches, start by preparing your fabric in an embroidery hoop. Transfer your design using tracing or transfer paper, then vary stitch types for a dynamic look. Add border details like merrowed edges and enhance with intricate stitching. Apply adhesive backing for durability. Attach to a canvas pouch by trimming excess fabric and reinforcing with extra stitches. Create the patch by stitching the design using different techniques. Secure the patch border with tacking stitches. Finally, finish with HeatnBond adhesive for longevity. Mastering these steps will help you craft unique patches for any purpose.
Fabric Preparation
Secure your fabric in an embroidery hoop to maintain tension for the stitching process. This step is crucial for achieving clean and professional-looking satin stitch embroidery. Make sure the fabric is taut within the hoop to prevent any wrinkles or puckering during stitching. Trim any excess fabric around the hoop to avoid interference with the embroidery process, allowing you to work smoothly and precisely.
Proper fabric preparation sets the foundation for a successful embroidery project. By securing the fabric in the embroidery hoop, you create a stable surface for stitching intricate designs. This step ensures that the fabric remains flat and even, facilitating the satin stitch technique.
Additionally, trimming the excess fabric around the hoop provides you with a clear working area, enabling you to focus on the embroidery without any distractions. Mastering this initial stage will lead to beautifully crafted custom embroidered patches.
Design Transfer
For precise design transfer onto your fabric for custom embroidered patches, consider employing various methods such as tracing, freehand drawing, or printing onto transfer paper.
You can use transfer pens, pencils, or carbon paper to trace your design onto the back of the fabric. If you prefer a more controlled approach, try using a lightbox or simply tape your design to a window during the day to easily trace it.
Take a little bit of extra time to ensure your design is centered and aligned properly before moving forward with the embroidery process. Experiment with different transfer methods to find the one that suits your needs best.
Stitching Techniques
When stitching custom patches, remember to vary your stitch types for a dynamic look. Choose the appropriate thread for your design, ensuring it complements the patch's aesthetic.
These two elements play a crucial role in creating a high-quality embroidered patch.
Stitch Types
Consider incorporating various stitch types to add depth and texture to your custom embroidered patches. Satin stitch is ideal for filling in large areas, creating a smooth and continuous appearance.
Running stitch achieves a dashed line effect by alternating the needle in and out of the fabric. Backstitch is a sturdy option commonly used for outlining designs, providing a secure finish.
If you're looking to add a textured, ropelike line to your patches, chain stitch is a great choice that can be used for both outlining and filling areas. Lastly, whip stitch offers a simple way to neatly finish the edges of your embroidered patches with an overcast stitch.
Thread Selection
Select high-quality embroidery thread with vibrant colors to enhance the durability and visual impact of your custom patches. Opt for threads that complement your design for a striking finish.
Utilize six strands of embroidery floss to ensure that your stitches appear full and well-defined on the patch. When stitching, employ a Number 5 DMC embroidery needle for smooth and precise results on various fabrics.
Initiate your stitching from the top of the patch and work downwards to maintain consistency and prevent gaps between stitches. As you finish the body of the patch, pay close attention to detail in your stitching to achieve a professional and polished appearance.
Adding Border Details
When adding border details to your custom embroidered patches, consider the various border styles available to enhance the appearance of your design.
Choosing the right border colors can make a significant impact on the overall look of your patch.
Selecting complementary colors will help create a polished and cohesive finish.
Choosing Border Styles
Explore various border styles, such as merrowed, hot cut, or laser-cut edges, to enhance the visual impact of your custom embroidered patches.
Merrowed borders are a popular choice for a classic and textured look, ideal for traditional designs.
On the other hand, hot cut edges provide a sleek and clean finish, perfect for modern and intricate patches.
If your design features complex details, laser-cut borders offer sharp edges and intricate cutting, ensuring a precise look.
When choosing a border style, consider not only the aesthetic appeal but also the durability of the patch.
The border style plays a significant role in how well the patch holds up over time, especially with frequent use.
Select a border style that not only complements the overall design but also enhances the final appearance of your custom patches.
Enhancing Patch Appearance
To enhance the appearance of your custom embroidered patches, consider adding intricate border details using various stitching techniques like satin stitch or blanket stitch. Adding a border not only provides a finished look but also helps define the edges of the patch, preventing fraying over time.
You can choose from stitching techniques such as satin stitch, blanket stitch, or whip stitch to create a border that complements your design. Opting for a contrasting thread color for the border can make your patch design stand out and pop. The type of border you choose should align with the overall style and theme of your custom embroidered patch.
Selecting Border Colors
Consider choosing border colors for your custom embroidered patches that enhance the overall design and make a visual impact. When selecting border colors, opt for contrasting hues to make your patch design stand out.
These contrasting colors can either complement the main colors of the patch or provide a bold outline for a more defined look. Experiment with different shades and tones to discover the border color that best enhances your patch's overall aesthetic.
Remember, the thickness of the border color can significantly impact the visual effect of the patch, so choose wisely based on the desired outcome. By selecting the right border color, you can unify your patch design and add a polished finishing touch to your embroidered creation.
Take the time to explore various options and find the perfect border color that will elevate the look of your custom embroidered patches.
Applying Adhesive Backing
Applying adhesive backing to custom embroidered patches enhances their durability and versatility. By adding a layer of adhesive to the back of the patch, you can easily attach it to a variety of surfaces without the need for stitching.
HeatnBond adhesive is a popular choice for this purpose due to its effectiveness and ease of use.
The adhesive backing not only simplifies the attachment process but also provides stability to the patch, making it more resistant to wear and tear. This added stability ensures that the patch stays securely in place when adhered to fabrics or other materials.
It's a crucial step in preparing custom embroidered patches for use, as it ensures that they're ready to be applied to your desired items with confidence.
Attaching to Canvas Pouch
Trim excess fabric around the embroidered patch for a clean finish when attaching it to a canvas pouch.
To ensure a secure attachment, follow these steps:
- Prepare the Patch: Trim any extra fabric carefully to give the patch a neat appearance.
- Apply Adhesive: Use a strong adhesive like HeatnBond to stick the patch onto the canvas pouch firmly.
- Dye the Canvas: Consider dyeing the canvas pouch in a color that complements the embroidered patch for a cohesive look.
- Reinforce with Stitches: Add extra stitches around the edges of the patch on the canvas pouch to provide additional reinforcement.
Stitching Around the Edge
To ensure a secure and polished finish for your custom embroidered patch, start by stitching around the edge using tacking stitches every half-inch. These stitches will help secure the border of the patch, preventing fraying or unraveling over time.
As you stitch, be sure to check for any loose threads and secure them with knots along the edge. If you start to feel any soreness in your fingers, take breaks to prevent discomfort and strain.
To finish off the stitching, tie knots at the end of the thread to ensure it stays in place. Consider adding extra stitches where necessary to enhance the durability and aesthetic appeal of your patch.
Final Finishing Touches
Consider adding a decorative border around your custom embroidered patch to provide a finishing touch that enhances its overall appearance. Here are four essential steps to give your patch a polished look:
- Add a desired border around the embroidered design, such as a simple satin stitch or an intricate lace trim, to frame the patch attractively.
- Trim excess fabric around the border carefully using sharp scissors to ensure a clean and professional finish without damaging the embroidery.
- Attach HeatnBond adhesive to the back of the patch for easy application on various surfaces, ensuring a secure and long-lasting bond.
- Secure the patch onto a canvas pouch or any desired item to create a versatile and stylish accessory that showcases your unique design.
Conclusion
Now that you've mastered the art of custom embroidered patches, you're ready to add a touch of personality to all your favorite items.
With a little creativity and patience, you can turn any plain fabric into a work of art that truly speaks to your unique style.
So grab your needle and thread, and let your imagination run wild as you stitch your way to patch perfection!