Machine embroidery is an amazing craft that allows you to turn ordinary fabric into beautiful, personalized art. Whether you're new to embroidery or looking to hone your skills, this guide will cover everything you need to know about different stitch types, how to fix common problems, and some tips for making the most of your embroidery machine.
What Is Machine Embroidery?
Machine embroidery is a creative technique that uses computerized machines to stitch intricate designs onto fabric. Unlike traditional hand embroidery, which requires hours of meticulous work, machine embroidery is fast and efficient. This method has gained popularity because it allows for complex patterns, uniformity, and customization. It's widely used in fashion, home decor, and even promotional materials, enabling individuals and businesses to create unique pieces with relative ease. The beauty of machine embroidery lies in its versatility—whether you're personalizing a jacket or creating a detailed wall hanging, there's a machine embroidery technique to suit your needs.
The process typically involves creating a design in embroidery software, transferring it to the machine, and then stitching it onto the chosen fabric. Machine embroidery opens up a world of possibilities, as you can use a wide variety of thread colors and stitch types to achieve different effects. The key to successful machine embroidery is a well-maintained machine and a solid understanding of the various elements involved, such as threads, stabilizers, and hooping techniques. This guide will cover everything you need to know to get started and create beautiful embroidered pieces.
Types of Embroidery Machines
Embroidery machines come in different types, catering to various skill levels and project sizes. Single-needle machines are ideal for beginners or those who do small-scale embroidery projects. They usually have a simple setup with a single needle that can be threaded with different colors. These machines are often more affordable and compact, making them perfect for home use. Despite their simplicity, single-needle machines can produce high-quality embroidery, making them an excellent choice for hobbyists and those who want to personalize items like towels, bags, or clothing.
Multi-needle machines, on the other hand, are designed for more complex projects and professional use. These machines typically have multiple needles, each pre-threaded with a different color, allowing for faster stitching and less manual intervention. They are perfect for intricate designs that require several color changes. Multi-needle machines are often used in small businesses and embroidery shops due to their efficiency and versatility. If you're considering machine embroidery as a business or have a high volume of projects, a multi-needle machine could be a worthwhile investment.
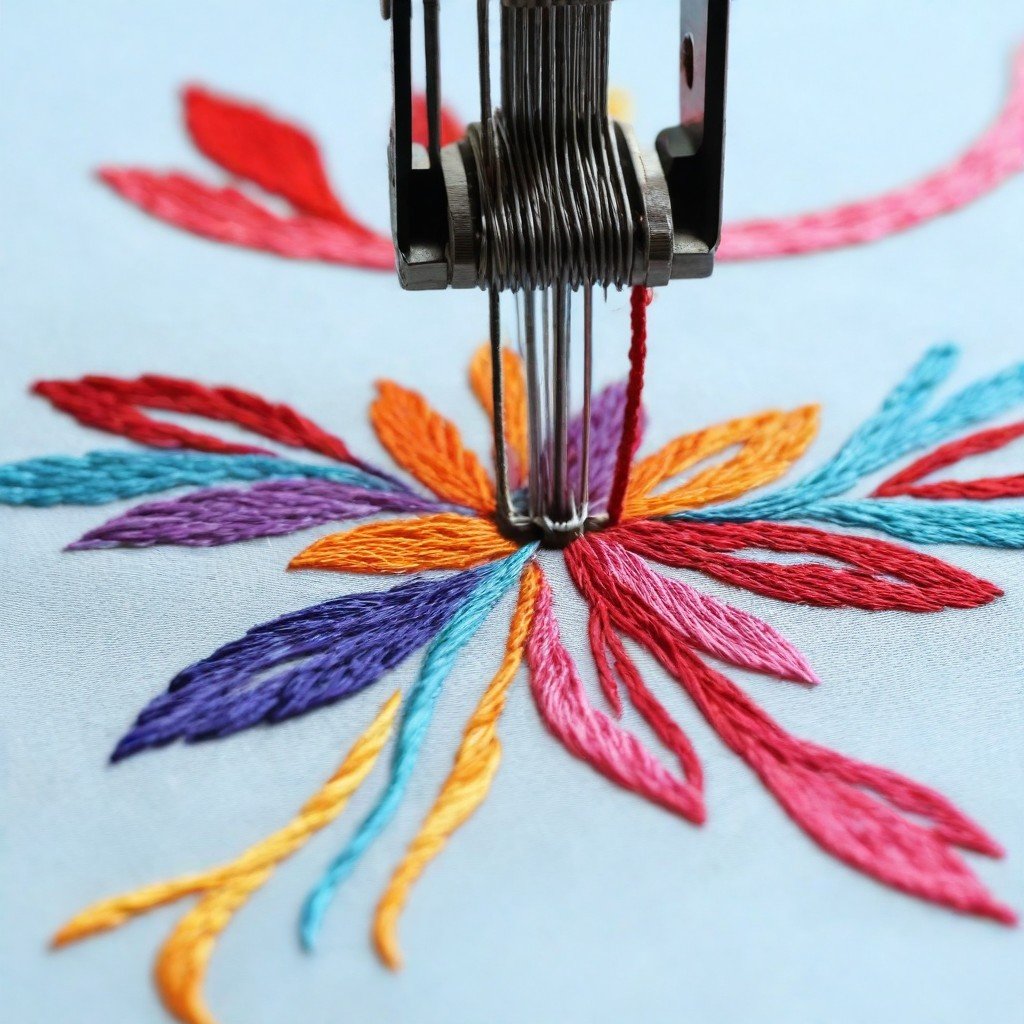
Common Embroidery Stitch Types
Embroidery stitches are the building blocks of any design, and knowing the common stitch types can help you create beautiful patterns. The satin stitch is a dense, solid stitch often used to create smooth areas of color. It’s ideal for lettering and bold outlines, giving a sleek finish to your designs. Satin stitches are commonly used for logos, monograms, and other designs that require a polished look. The key to a good satin stitch is maintaining consistent tension and using high-quality thread to prevent fraying.
The fill stitch is used to cover larger areas with a consistent pattern, creating a textured look. This stitch can vary in density, allowing you to adjust the appearance of the filled area. Fill stitches are commonly used in complex designs, providing depth and dimension. Another common stitch type is the back stitch, which creates solid lines by stitching backward over the previous stitch. This is often used for outlining shapes or adding detail to an embroidered design. Finally, the chain stitch creates a unique, interlocking loop pattern, adding a decorative touch to your projects. Each stitch type has its own use cases, and mastering them can significantly improve the quality of your embroidery.
Choosing the Right Thread for Embroidery
The type of thread you choose for machine embroidery can significantly impact your projects' quality, durability, and appearance. Polyester thread is a popular choice because it's strong, vibrant, and resistant to fading and stretching. This makes it ideal for garments and items that will be washed frequently. Polyester thread comes in a wide range of colors and can withstand high temperatures during ironing or washing, making it a reliable choice for most projects.
Rayon thread, on the other hand, offers a shiny, silk-like finish, which can add a luxurious touch to your embroidery. However, it's not as durable as polyester and may not hold up as well with repeated washing or exposure to sunlight. Rayon is often used for decorative embroidery on items that aren't washed frequently, like wall hangings or decorative pillows. Cotton thread is another option, offering a matte finish and a more traditional look. It's commonly used for hand embroidery but can also be used in machine embroidery, especially for projects that require a softer, more natural texture. The choice of thread depends on your project requirements and personal preferences.
Understanding Embroidery Stabilizers
Embroidery stabilizers are essential for maintaining fabric stability during stitching. They prevent the fabric from shifting or stretching, ensuring that the embroidery design comes out crisp and precise. Tear-away stabilizers are a common type, designed to be removed by tearing them away from the embroidery after stitching. They're ideal for light to medium-weight fabrics and are easy to use, making them a popular choice for beginners. Tear-away stabilizers are suitable for simple designs that don't require a lot of support.
Cut-away stabilizers, on the other hand, are more durable and remain in place after embroidery. They're perfect for heavier fabrics and complex designs that require additional support. Because they stay in the fabric, cut-away stabilizers provide long-lasting stability, preventing distortion over time. Water-soluble stabilizers are unique because they dissolve in water, leaving no residue. This makes them perfect for projects where you don't want any stabilizer showing, like lace embroidery or projects with delicate fabrics. Choosing the right stabilizer depends on the type of fabric and the complexity of the design.
Setting Up Your Embroidery Machine
Setting up your embroidery machine correctly is crucial to achieving great results. The process begins with ensuring that the machine is clean and free from dust or debris. Proper threading is essential; make sure the thread passes through all the guides and tension discs without any tangles or snags. Incorrect threading can lead to issues like thread breakage or skipped stitches. It's also important to check that the embroidery foot is attached securely and that the needle is the correct size for your thread and fabric.
Another key aspect of setting up your embroidery machine is adjusting the tension. Proper tension ensures that the thread feeds smoothly and creates even stitches. If the tension is too tight, the thread may break; if it's too loose, the stitches can look sloppy. Once your machine is properly set up, test it on a scrap piece of fabric to ensure everything is running smoothly. This test can help you catch any issues before you start your main project. Proper setup not only improves the quality of your embroidery but also extends the life of your machine.
Hooping the Fabric
Hooping the fabric correctly is critical for achieving smooth and accurate embroidery. The process involves securing the fabric between two rings (the inner and outer hoops) to keep it taut during stitching. To hoop the fabric, place the inner hoop under the fabric and the outer hoop on top, then tighten the screw until the fabric is held firmly in place. It's important to ensure the fabric is smooth and centered to avoid puckering or distortion during stitching. If the fabric isn't tight enough, the embroidery can look uneven, and the machine might struggle to maintain consistent tension.
Before you start hooping, consider using a stabilizer to support the fabric. This adds extra strength and prevents shifting during stitching. Depending on your project, you might choose a tear-away, cut-away, or water-soluble stabilizer. Proper hooping technique involves gentle pressure to avoid stretching the fabric too much, which can cause puckering. Once the fabric is hooped, double-check that it's secure by lightly tugging at the edges. If it moves or wrinkles, adjust the hooping to ensure a smooth and stable embroidery surface.
Loading Embroidery Designs
Loading embroidery designs into your machine is a key step in the embroidery process. Most modern embroidery machines allow you to load designs from a USB drive, memory card, or built-in software. If you're creating your own design, use embroidery software to create or edit the design before transferring it to the machine. This software lets you adjust size, colors, and stitch density to ensure the design fits your project. Once the design is ready, save it in a compatible format and load it onto your embroidery machine.
Before stitching, preview the design on the machine's screen to ensure it's positioned correctly. This step allows you to make any last-minute adjustments to the size or placement of the design. Some machines also let you rotate or mirror the design to fit different fabric orientations. Once you're satisfied with the setup, secure the hooped fabric to the machine's embroidery arm and align it with the design's starting point. Double-check all settings, such as thread colors and tension, before starting the stitching process. Proper design loading and alignment are crucial for achieving accurate and well-placed embroidery.
Common Machine Embroidery Problems and How to Fix Them
Machine embroidery is a rewarding craft, but it comes with its fair share of challenges. Thread breakage is one of the most common problems and can be caused by various factors. A bent needle, incorrect tension, or poor-quality thread can all lead to thread breakage. To fix this, start by replacing the needle with a new one and checking the tension settings. Make sure the thread is correctly threaded through all guides and tension discs. If the problem persists, examine the thread path for any obstructions or sharp edges that could be causing the breakage.
Another common issue is skipped stitches, where the machine fails to stitch in certain areas. This is often due to a dull needle, incorrect tension, or fabric instability. To resolve this, replace the needle with a sharp one and adjust the tension to ensure a smooth thread flow. Puckering is yet another issue, often caused by improper hooping or a lack of stabilizer. To fix puckering, re-hoop the fabric, ensuring it's taut and centered, and use a stabilizer that matches the fabric's weight. If puckering occurs during stitching, you might need to adjust thethread tension or use a different stitch type. By addressing these common problems, you can enjoy a smoother and more successful embroidery experience.
Tips for Successful Machine Embroidery
Successful machine embroidery requires a combination of skill, practice, and attention to detail. One of the most important tips is to use high-quality thread and needles. Cheap thread can lead to breakage and inconsistent stitching, while a dull needle can cause skipped stitches or damage to the fabric. Invest in good-quality materials to ensure your projects turn out beautifully. Regular maintenance of your embroidery machine is also essential. Keep it clean and lubricated, and follow the manufacturer's recommendations for servicing.
Another tip is to always test your designs on scrap fabric before starting a new project. This allows you to catch any issues with tension, thread color, or stitch density before they become a problem. Testing also gives you a chance to make adjustments to the design or machine settings to ensure a perfect outcome. Don't be afraid to experiment with different stitch types and thread colors to add variety to your projects. Successful machine embroidery is all about creativity and practice, so take your time and enjoy the process.
Creative Ideas for Machine Embroidery
Machine embroidery opens up a world of creative possibilities, allowing you to add personal touches to a wide range of items. One popular idea is to personalize clothing with monograms, names, or custom designs. This can be a great way to add flair to your wardrobe or create unique gifts for friends and family. You can also use machine embroidery to create custom patches for jackets, backpacks, or hats. These patches can feature logos, characters, or intricate designs, giving your accessories a unique and stylish look.
Home decor is another area where machine embroidery shines. You can create custom pillows, table runners, or curtains with embroidered designs that match your style. Embroidered wall art is also a great way to add a personal touch to your home. If you're looking for gift ideas, consider creating embroidered tote bags or aprons. These make thoughtful and personalized gifts for birthdays, holidays, or special occasions. With machine embroidery, the only limit is your imagination, so don't be afraid to get creative and explore new ideas.
Machine Embroidery Projects for Beginners
If you're new to machine embroidery, start with simple projects that help you build confidence and skills. One of the easiest projects for beginners is monogrammed towels. These allow you to practice hooping, stitching, and thread selection without getting overwhelmed by complex designs. Choose a simple monogram or initial and stitch it onto a hand towel or bath towel. This project is quick and easy, making it a perfect way to get started with machine embroidery.
Another beginner-friendly project is embroidered patches. These can be used to decorate jackets, backpacks, or even jeans. Start with a simple design, like a flower or star, and embroider it onto a piece of fabric. Once the patch is complete, you can attach it to your chosen item with a few simple stitches. Decorative tea towels are also a fun beginner project. Embroidering designs on tea towels lets you practice different stitch types and explore your creativity. By starting with these simple projects, you'll gain the skills and confidence to tackle more complex embroidery designs.
Conclusion
Machine embroidery is a versatile and rewarding craft that allows you to create personalized items for yourself and others. Whether you're interested in monogramming, custom patches, or intricate designs, machine embroidery offers endless possibilities. To succeed in this craft, focus on proper machine setup, high-quality materials, and consistent practice. Don't be afraid to experiment with different stitch types and creative ideas to find your unique style.
As you continue your machine embroidery journey, remember to maintain your machine regularly and stay open to learning new techniques. The more you practice, the more confident you'll become in creating beautiful embroidered pieces. Whether you're a beginner or an experienced embroiderer, there's always something new to explore in the world of machine embroidery.
Frequently Asked Questions (FAQs)
1. What's the best thread for machine embroidery?
Polyester thread is a popular choice due to its durability and vibrant colors. Rayon thread is also great for decorative work, while cotton thread offers a traditional look.
2. Why does my embroidery machine keep skipping stitches?
Skipped stitches can be caused by a dull needle, incorrect tension, or fabric instability. Try changing the needle and adjusting the tension to resolve the issue.
3. Do I need stabilizers for machine embroidery?
Yes, stabilizers are essential for keeping fabric stable during stitching. Choose the right stabilizer based on your fabric and design complexity.
4.Can I use any fabric for machine embroidery?
You can use most fabrics, but some are easier to work with than others. Cotton and polyester blends are common choices, while stretchy or sheer fabrics may require extra care.
5. How do I fix thread breakage during machine embroidery?
Thread breakage can occur due to a bent needle, incorrect tension, or low-quality thread. Check the needle and thread path, and ensure you're using high-quality thread.